Copy Write 4/1/2002 © Updated 12/19/2005 Port Side Stalled Starboard Side Keel Trunk Keel Pendant Tube Disclaimer E- Mail Port Side
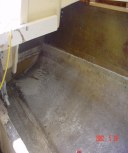
Ok, here's the drill. There is a pedestal forward on the port side near the V-Berth for the honey pot. With the raised part of the keel trunk in the same area the potty is difficult to get to. I want to modify the portside bunk and re-build with better storage and the potty moved back near the companionway. My current portside quarter berth runs all the way back to the bulkhead between the cockpit and the cabin. When I rebuild I want the quarter berth to start at the v-berth bulkhead and go back to the new port a potty location. The section underneath the cockpit changed to improved storage
Inspecting the bunk, the grinder seems to be the weapon of choice. If you don't have one for your boat I highly recommend you get one. Where the bunk seams up to the hull the disk cuts right thru. This will go much faster than I thought. In no time the forward section is freed from the boat, the stern section will be difficult, as I must crawl back there. The hardest part is the stern end, as it butts up against the bulkhead separating the cabin from the cockpit lockers. Just let the grinder dig in blind and hack it free. It looks like a blizzard in the cabin; the grinder makes a power fine dust. The bunk won't come out in one piece. Where the bunk meets the port a potty pedestal once again the grinder makes short work. The two sections are removed. A belt sander makes short work of the fiberglass stubble left after cutting out the bunk. For some reason I thought this would be time consuming, the belt sander has a dust bag, it sure helps keep things cleaner. What to do about all the dust caused by grinding and sanding? The decision is made to wet it down the cabin with a water hose make sure the dust gets soaked. Then sop it up with bailing sponges. A wet/ dry shop vacuum works well at getting everything cleaned up. Due to summer heat it doesn't take long for the boat to dry up. Paint stripper is used to clean up some areas inside that had been painted years ago The bunks are an important part of hull support. I never noticed much "oil canning" with the bunk out the hull flexes noticeably as you walk on it. It will stiffen back up once the new bunk and port a potty pedestal are in place. Also some bracing for the keel will be incorporated. A treated 1"x4"x10' is cut down to fit along the hull as a stringer. Next project is the bulkhead, 2 �' from the companionway a line is scribed along the side of the cabin. This 2-� foot section will provide space for the port-a-potty. I use the cut and hack approach to fashioning stuff to fit the curving hull. For a template a piece of cheap thin pressboard was used, a saber saw cuts it quickly and I was pleased to note the pressboard did not make too much of a mess as it was cut. Once the pressboard was trimmed as close as my skill would allow the template was transferred to some �" treated plywood, back in the boat for additional trimming. It fits ok but could stand some improvement. Back outside and using the existing plywood as a template a second bulkhead is cut, after some trimming it fits much better. Sitting in the boat with a box fan and the cabin fan blowing full blast I admire the handy work. One bulkhead won't provide as much support as I want. Using the existing pressboard it is trimmed some more to fit the different curve of the hull about 3' forward of the first bulkhead. It didn't take too long to trim the first attempt into shape for the second bulkhead. Now comes the fun part, the 1"x4"x10' stinger needs to be glassed in, looking at the wood I realize I need some jacks and braces to make the wood plank conform to the hull curve. With the stringer aligned the first location is about 2' back from the V-berth. The second jack is stuffed under the cockpit overhang. This worked better than anticipated, original estimate was three jacks, only needed the two. With the summer temperature in the 90's doesn't take long for the resin to set up. Pretty simple process, paint a good coating to the hull and stinger then the mat is pressed in place (rubber gloves come in handy), start applying more resin until the mat is good and wet. Let it kick off some then start on the next layer. Only way to do this is in sections. Another day I will run a belt sander over the stringer to smooth things out and apply a finish layer of glass and resin. Once the resin has kicked off and hardens some the bulkheads are fitted back and cut outs for the stringer trimmed. Looking at the bulkheads I notice one is a bit bowed in the middle. If a 2" x "2 is glassed vertically along the keel trunk end of the bulkheads the 2x2's will pull out the curve, give additional support and area to glass the end of the bulkheads to the keel trunk. The belt sander is used to smooth the fiberglass applied to the stringer and a few other areas needing touch up. Two more applications of cloth and glass will seal things up.
Over last few days several coats of resin was applied to seal up the bulkheads before installing them into the boat. A line is scribed along the keel trunk 1" down from the top; once the decking is installed there should be �" of keel trunk to act as a fiddle along the side.
A wooden "U" and shim is cut to hold the end of the bulkhead in place. The "U" fits over the 2 x 2 and the width of the keel trunk. Fitting the shim in holds the bulkhead against the keel trunk.
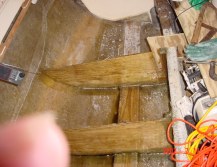
Squaring the aft bulkhead as best I know how, some tape is cut into small sections, rather than glass everything at one time some small strips will be set in and allowed to kick off there by holding the bulkhead in place. Once the tabs have hardened it is time to apply the rest of the strips of glass tape and resin. After the resin has kicked off it is time to move to the next bulkhead.
The second bulkhead is 1' 10" forward of the first. Before long this second bulkhead is glassed in place using the same technique as the first. Later after the resin has set up and cured a grinder and belt sander will be used to dress up the fiberglass work. A final application of tape and resin finishes the bunk and keel supports. A longitudinal brace running lengthwise atop the stringer needs to be cut. The way the hull angles up to the bow makes this a real cut and hack job. Eventually the brace is hacked into shape; I am in luck it fits tight. Fortunately I had enough sense about me to check everything for level. The part that fits up to the forward bulkhead is 11" going forward the brace must be angled along its length so the decking will sit level. Once everything dry fits the polyester resin is applied. South Coast used a liquid adhesive to glue the original fabric liner to the hull; the previous owner used tube type glue to re-attach sections of the fabric liner. By the time I bought the boat the liner was in real sad shape. First thing was to rip the liner out, I never bothered to do much with the remaining mess, lots of glue and bits of foam stuck to the sides. I crawled up into the V-berth with a paint brush in hand to spread the paint stripper. After allowing time for the paint stripper to work, scraping with a putty knife gets most of the stuff off. Using a square brush attachment on my handy dandy (every boat owner needs one) shop vacuum. The walls are scrubbed with the vacuum removing a lot of small stuff the scraper did not get. Along the starboard side of the cabin the same thing, the section underneath the companionway and cockpit starboard side is left for another day. Most of the big stuff comes off, there are places needing a second coating of paint stripper. I have been putting this off for many years, I'm glad it is finally over. I used cardboard to cut a template for the decking then transferred the pattern to what passes as 3/8ths inch plywood. As usual it took several trips back and forth for final fit trimming. I think my best friend Mr. Murphy has forgotten about me. I only cut one panel out of the plywood sheet I bought for this project and managed to get it right.
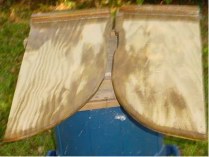
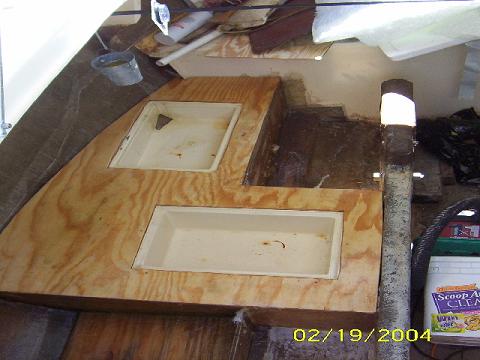
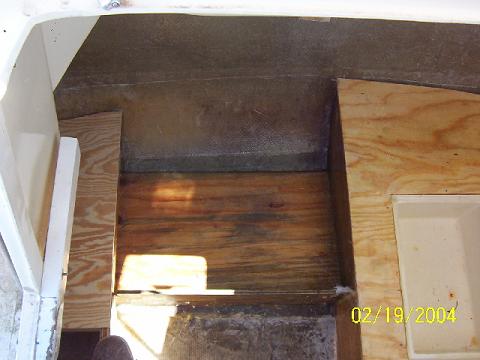
With the decking in place the storage bins from the original bunk are brought in and placed upside down on the top of the deck. After some adjusting the footprint of the storage bins is traced on the plywood. The bins have a lip around them to allow me to glass them back in place. I measured the distance from the edge of the lip to where I want the edge of the hole for the storage bins. The measurements are transferred to the plywood panel that will be the bunk deck. To keep the corners of my cut out holes from splintering and to help round the corners with my skill saw, a hole was drilled in each corner. Once again saw dust is flying as I carefully cut out the holes for the storage bins. The cut outs will be cleaned up and I will make the covers for the storage bins.
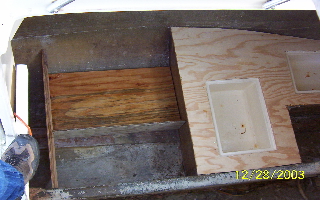
The belt sander made quick work of cleaning up and smoothing the plywood deck.
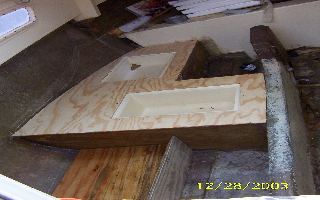
They say "pride goes before a fall". I discovered today my friend Murphy had not forgot about me, rather decided to be real sneaky. There were two storage bins glassed into the deck. The one forward is shallow, but apparently not shallow enough. I laid out the location of the bin as best the space would allow. This morning as I attempted to fit the deck in place discovered my folly.
The deck doesn't fit!!!!
Looks like the depth of the forward bin and the curve of the hull is creating a conflict. If I had moved the bin about an inch or so to the right it may have fit, worse case fit better than what I got now.
Have I ever mentioned how handy my 4" grinder is when doing boat work?
Well eventually the surgery is over and the corner of the storage bin adjusted to allow the deck to fit.
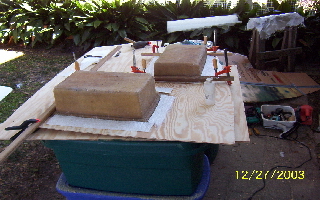
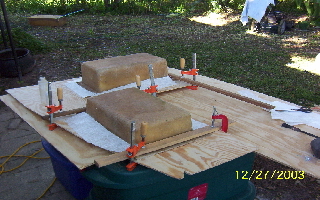
Next comes the dry fitting of the new port-a-potty pedestal. The resin applied yesterday has hardened and the pieces are placed together, some trim work is needed to make them fit.
Everything looks good and they are removed finish sanded and prepped for the application of a coat of sealing resin on the other sides.
The deck is removed and the offending corner dressed up.
Resin mixed and applied.
Finally this cabin refit has progressed to the point I actually think it may get finished.
The pedestal for the port-a-potty is glassed in and left to dry. Other projects need my attention.
With the resin cured of the other day the last major piece of this puzzle needs designing.
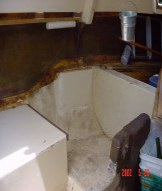
I want a raised storage deck extending back to the bulkhead separating the cabin from the cockpit lockers. One of the big problems with the cabin is the keel pendant tube. It has a tendency to slop water everywhere. Any thing stored aft in the cabin needs to be water proof. Using a 2X4 a support is screwed in place then using cardboard for a cut out a template is fashioned to fit.
From this template my last substantial piece of plywood is chopped up to fit as the deck.
Once all the pieces are fit back in the boat to double check everything the new deck is removed to be covered with a sealer coat of resin. A few other spots need resin and cloth, everything is left to dry.
All the puzzle pieces are put in place and glassed in. It is so great to finally get to this point!
Until the resin hardens up good there is not much else left to do in the cabin.
Rounding up the belt sander, pad sander, grinding bits for the electric drill and sand paper it is time for some serious cleaning up of wayward bits of fiberglass cloth and resin, following another application of resin and cloth to hold everything down. StalledHis whole project has stalled First there was a career change then Hurricane Ivan September 2004 then the decision to level our house and build a new one. So far this project has been stalled for 3 years. At this time "Don't Ask" is stranded in my back yard which due to the fact our house has been leveled the back yard is part of the front yard. Until we get our house built and we move backin; finishing the boat is not a priority. Starbord SideI will leave this side alone the current layout is satisfactory. Keel TrunkKeel hanging arrangement on the South Coast 22' fleet is about as simple as it gets. A hole is drilled thru the keel and the keel bolt runs thru. No bushings or complicated mounting. Over the years some wear in the pin hole allows the keel to slop back and fourth just a bit. I have also noticed a bit of sway in the keel trunk nothing serious. Incorporated into the berth modifications will be additional bracing for the keel trunk. Keel Pendant TubeWith all the South Coast owners still around I would think somebody would have developed some kind of fix for water slopping up into the cabin. So far all I have is ideas on minimizing most of which work Ok to a point. Regardless cabin floor gets wet, fair weather not to much water gets in. If the weather kicks up a bit a lot more water slops in. I need to design a way to contain the water that does get in. Ideally in such a manor as to allow it to drain back down the keel pendant tube.
It is my delusion boxing in the keel pendant area will reduce water spurting all over the cabin and allow two things to happen.
|
DisclaimerThe information on this page is not intended as a "definitive" guide to sailing . formated for 800 x 600 and Cascading Style Sheets |